Azure Functions Using F#

When Azure Functions first came out, F# had pretty good support – templates, the ability to run a .fsx file, cool examples written by Don… Fast forward to 2021 and we have bupkis. I recently wrote a dictionary of amino acid weights that would be perfect as a service: pass in a kmer length and weight, get all hits from amino acids.

I first attempted to create a function app, select a .fsx template, and write the code in my browser. Alas, only .csx scripting is available.

I attempted to remove the .csx file and put a .fsx file in via Kudu, but it looks like support for F# scripting is not installed. I created an issue on Azure User voice, but Jordan Marr beat me to it by about 2 years.

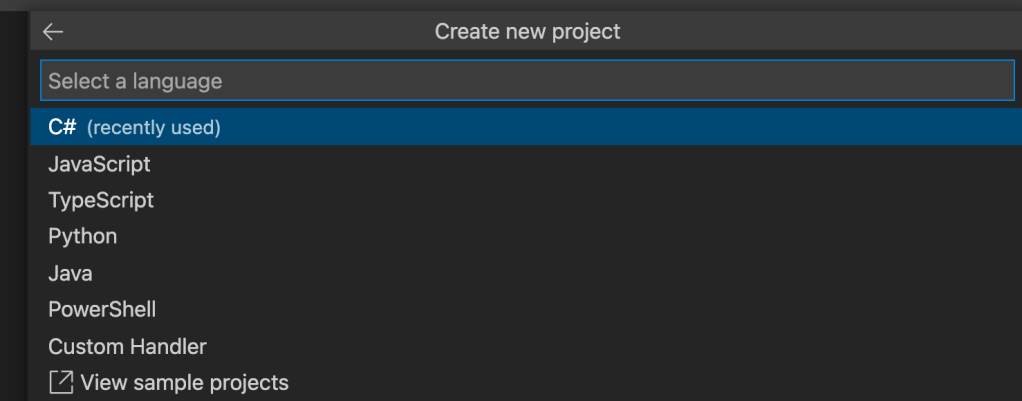
I then attempted to open VS Code and upload a function to Azure. Alas, only C# templates are available in VS Code and replacing .fs and .fsproj files in the OOB project fails on compile.

I then installed Visual Studio (remember that?) hoping that it might have some templates. Nope.

So I ranted on Twitter and I got some helpful advice from Jon Canning and Jiri Landsman: both have projects on Git Hub that create an Azure Function: here and here. I downloaded them – Jon’s took some work because I didn’t have Paket installed. I am amazed that for a simple “Hello World” return from a http request takes 11 files and of the two files that have F# code, there are 31 lines of code. That is about 1 file and two lines of code per character.

I got both project building locally, but I was at a loss about how to actually deploy them to Azure since there was not a built-in facility in VS Code or Visual Studio. Jon pointed me to this article where I figured out the deployment.

Here are the steps to get a F# Azure Function working:

  1. Go into Azure and create a Azure Function App
  2. Download either Jon or Jiri’s template
  3. Build the template locally
  4. Go to the bin folder and compress the contents. Do not compress the folder itself.
  5. Go to the Kudu zip deploy screen using the uri of https://xxx.scm.azurewebsites.net/ZipDeployUI
  6. Drag/Drop the .zip file you made in #4 into the screen. Wait for Kudu to finish
  7. Go to your function app and hopefully see your new function
  8. Navigate to that function to see it working
  9. Lament the fact that you have to jump though all of these hoops when all you wanted to do was just return “hello world” to a http request

I have not tried deploying to Azure from GitHub yet. If past experience is any indication, I will need to carve out a Saturday to do it. What really annoys me is that I have a limited time to work on this project and instead of actually writing code that will help cure diabetes, I am spending it doing this garbage. No wonder academics just do everything on their machine. Hopefully Microsoft will recognize this fact and devote more help to people trying to solve domain problems so we can spend less time worrying about solving Microsoft Infrastructure puzzles.

Building Amino Acid Lookup Dictionaries Using Python and F#

The heart of hypedsearch is a “seed and extend” algorithm. We take the results from the mass spectrometry and compare them to our known dictionary of peptides to see if any are hybrid. The problem is that the mass-spec observations can be 1 to n amino acids and there is considerable noise in the samples. As a way of increasing compute time performance, we decided to break the dictionary of known peptides into a catalog of fragments with each catalog based on the size of the kmer used to break the protein’s amino acid chains into parts. The idea is to pass a weight from a mass-spec observation and get a return of all possible peptides that have the same weight (measured in daltons)

I first implemented the dictionary is python since that is what hypedsearch is written in. The proteins are stored in a file format called “.fasta” which is the de-facto standard for storing genomic and proteomic data. There is actually a fasta module that makes reading and parsing the file a snap. After reading the file, I parsed the contents into a data structure that contains the name of the protein and a collection of amino acids – each with their individual weight

Amino_Acid = namedtuple('Amino_Acid', ['Id', 'Weight' ],defaults=['',0.0])
Protein = namedtuple('Protein',['Name', 'Amino_Acids'],defaults=['', []])

def extract_protein_name(description):
    return description.split('|')[-1].split()[0]

def generate_amino_acid(character):
    weights = {
    "A": 71.037114,"R": 156.101111,"N": 114.042927,"D": 115.026943,"C": 103.009185,
    "E": 129.042593,"Q": 128.058578,"G": 57.021464,"H": 137.058912,"I": 113.084064,
    "L": 113.084064,"K": 128.094963,"M": 131.040485,"F": 147.068414,"P": 97.052764,
    "S": 87.032028,"T": 101.047679,"U": 150.95363,"W": 186.079313,"Y": 163.06332,
    "V": 99.068414,"X": 0, "B": 113.084064, "Z": 0 }
    weight = weights.get(character)
    return Amino_Acid(character,weight)

def extract_amino_acids(sequence):
    amino_acids = []
    for character in sequence:
        amino_acid = generate_amino_acid(character)
        amino_acids.append(amino_acid)
    return amino_acids      

def generate_proteins(fasta_parser):
    proteins = []
    for entry in fasta_parser:
        protein_name = extract_protein_name(entry.description)
        amino_acids = extract_amino_acids(entry.sequence)
        protein = Protein(protein_name,amino_acids)
        proteins.append(protein)
    return proteins

The next step is to create a data structure that has a attribute of weight and the amino acids associated with that weight – with the index from the original protein of where that amino acid chain is located (note that I used amino acid chain and peptide interchangeably, apologies if some biologist out there just threw their Cheetos at the screen).

Protein_Match = namedtuple('Protein_Match',['Protein_Name', 'Weight', 'Start_Index', 'End_Index'], defaults=['',0,0,0])

def get_cumulative_weights(amino_acids, kmer_length):
    df_all = pd.DataFrame(amino_acids)
    df_weights = df_all.loc[:,'Weight']
    windows = df_weights.rolling(kmer_length).sum()
    no_nan_windows = windows.fillna(0)
    rounded_windows = no_nan_windows.apply(lambda x: round(x,2))
    return rounded_windows

def generate_protein_match(protein, data_tuple, kmer_length):
    protein_name = protein.Name
    (start_index, weight) = data_tuple
    end_index = start_index + kmer_length
    return Protein_Match(protein_name,weight, start_index,end_index)

def get_protein_matches(protein, kmer_length):
    protein_matches = []
    cumulative_weights = get_cumulative_weights(protein.Amino_Acids,kmer_length)
    indexes = cumulative_weights.index.tolist()
    values = cumulative_weights.values.tolist()
    data_tuples = list(zip(indexes,values))
    for data_tuple in data_tuples:
        protein_match = generate_protein_match(protein, data_tuple, kmer_length)
        protein_matches.append(protein_match)
    return protein_matches

def generate_proteins_matches(proteins,kmer_length):
    proteins_matches = []
    for protein in proteins:
        protein_matches = get_protein_matches(protein,kmer_length)
        proteins_matches = proteins_matches + protein_matches
    return proteins_matches

Once I had all of the proteinweights for a given kmer, I could then bundle them up into a data structure that had all of the records associated with a single weight.

Weight_Protein_Matches = namedtuple('Weight_Protein_Matches',['Weight','Protein_Match'],defaults=[0,[]])

def handle_weight_protein_matches(weight_protein_matches, all_weight_protein_matches):
    exists = False
    for item in all_weight_protein_matches:
        if item.Weight == weight_protein_matches.Weight:
            item.Protein_Match.append(weight_protein_matches)
            exists = True
            break
    if exists == False:
        all_weight_protein_matches.append(weight_protein_matches)

def generate_all_weight_protein_matches(protein_matches):
    all_weight_protein_matches = []
    for protein_match in protein_matches:
        weight = protein_match.Weight
        weight_protein_matches = Weight_Protein_Matches(weight, [protein_match])
        handle_weight_protein_matches(weight_protein_matches,all_weight_protein_matches)
    return all_weight_protein_matches

Nothing really exciting here (the way code should be) – just lots of loops. I did try to avoid mutable variables and I am not happy with that one early return in handle_weight_protein_matches. I then took the functions out for a spin.

file_path = '/Users/jamesdixon/Documents/Hypedsearch_All/hypedsearch/data/database/sample_database.fasta'
fasta_parser = fasta.read(file_path) #n = 279
proteins = generate_proteins(fasta_parser)
proteins_matches = generate_proteins_matches(proteins,2) #n=103163 for kmer=2
all_weight_protein_matches = generate_all_weight_protein_matches(proteins_matches) #n=176 for kmer=2 and round to 2 decimal places
print(all_weight_protein_matches)

And it ran like a champ

So then I thought “I am not a fan of all of those loops and named tuples for data structures leaves a lot to be desired. I wonder if I can implement this in F#? Also I was inspired by Don teaching Guido F# last week might have entered my thinking. Turns out, it is super easy in F# thanks to the high-order functions in the language.

Step one was to read the data from the file. Unlike python, there is a not a .fasta type provider AFAIK so I wrote some code to parse the contents (thank you to Fyodor Soikin for answering my Stack Overflow question on the chunk function)

type FastaEntry = {Description:String; Sequence:String}

let chunk lines =
    let step (blocks, currentBlock) s =
        match s with
        | "" -> (List.rev currentBlock :: blocks), []
        | _ -> blocks, s :: currentBlock
    let (blocks, lastBlock) = Array.fold step ([], []) lines
    List.rev (lastBlock :: blocks)

let generateFastaEntry (chunk:String List) =
    match chunk |> Seq.length with
    | 0 -> None
    | _ ->
        let description = chunk |> Seq.head
        let sequence = chunk |> Seq.tail |> Seq.reduce (fun acc x -> acc + x)
        Some {Description=description; Sequence=sequence}

let parseFastaFileContents fileContents = 
    chunk fileContents
    |> Seq.map(fun c -> generateFastaEntry c)
    |> Seq.filter(fun fe -> fe.IsSome)
    |> Seq.map(fun fe -> fe.Value)

Generating the amino acids and proteins was roughly equivalent to the python code – though I have to admit that the extra characters when setting up the amino acid record types was annoying compared to the name tuple syntax. On the flip side, no for..each – just high order .skip, .head, .map to do the work and .toList to keep the data aligned.

type AminoAcid = {Id:String; Weight:float}
type Protein = {Name:string; AminoAcids: AminoAcid List}

let extractProteinName (description:string) =
    description.Split('|')
    |> Seq.skip 1
    |> Seq.head

let generateAminoAcid (character:char) =
    match character with
    | 'A' -> {Id="A"; Weight=71.037114}| 'R' -> {Id="R"; Weight=156.101111} 
    | 'N' -> {Id="N"; Weight=114.042927} | 'D' -> {Id="D"; Weight=115.026943} 
    | 'C' -> {Id="C"; Weight=103.009185} | 'E' -> {Id="E"; Weight=129.042593} 
    | 'Q' -> {Id="Q"; Weight=128.058578} | 'G' -> {Id="G"; Weight=57.021464} 
    | 'H' -> {Id="H"; Weight=137.058912} | 'I' -> {Id=":I"; Weight=113.084064} 
    | 'L' -> {Id="L"; Weight=113.084064} | 'K' -> {Id="K"; Weight=128.094963} 
    | 'M' -> {Id="M"; Weight=131.040485} | 'F' -> {Id="F"; Weight=147.068414} 
    | 'P' -> {Id="P"; Weight=97.052764} | 'S' -> {Id="S"; Weight=87.032028} 
    | 'T' -> {Id="T"; Weight=101.047679}| 'U' -> {Id="U"; Weight=150.95363} 
    | 'W' -> {Id="W"; Weight=186.079313} | 'Y' -> {Id="Y"; Weight=163.06332} 
    | 'V' -> {Id="V"; Weight=99.068414} | 'X' -> {Id="X"; Weight=0.0} 
    | 'B' -> {Id="B"; Weight=113.084064} | 'Z' -> {Id="Z"; Weight=0.0}
    | _ -> {Id="Z"; Weight=0.0}

let extractAminoAcids(sequence:string) =
    sequence.ToUpper().ToCharArray()
    |> Seq.map(fun c -> generateAminoAcid c)
    |> Seq.toList

let generateProtein(fastaEntry:FastaEntry)=
    let name = extractProteinName fastaEntry.Description
    let aminoAcids = extractAminoAcids fastaEntry.Sequence
    {Name=name;AminoAcids=aminoAcids}

let generateProteins parsedFileContents =
    parsedFileContents
    |> Seq.map(fun fc -> generateProtein fc)
    |> Seq.toList

On to the ProteinMatch data structure

type ProteinMatch = {ProteinName:string; Weight:float; StartIndex:int; EndIndex:int}

let generateProteinMatch (protein: Protein) (index:int) (aminoAcids:AminoAcid array) (kmerLength:int) =
    let name = protein.Name
    let weight = 
        aminoAcids 
        |> Array.map(fun aa -> aa.Weight)
        |> Array.reduce(fun acc x -> acc + x)
    let startIndex = index * kmerLength 
    let endIndex = index * kmerLength + kmerLength      
    {ProteinName = name; Weight = weight; StartIndex = startIndex; EndIndex = endIndex}

let generateProteinMatches (protein: Protein) (kmerLength:int) =
    protein.AminoAcids
    |> Seq.windowed(kmerLength)
    |> Seq.mapi(fun idx aa -> generateProteinMatch protein idx aa kmerLength)

let generateAllProteinMatches (proteins: Protein list) (kmerLength:int) =
    proteins 
    |> Seq.map(fun p -> generateProteinMatches p kmerLength)
    |> Seq.reduce(fun acc pm -> Seq.append acc pm)

So I love the windowed function for creating the slices of kmers. Compared to the python, I find the code is much more readable and much more testable – plus the bonus of parallelism by adding “PSeq”.

To the last data structure

type WeightProteinMatches = {Weight:float; ProteinMatchs:ProteinMatch list}

let generateWeightProteinMatches (proteinMatches: ProteinMatch list)=
    proteinMatches
    |> Seq.map(fun pm -> {ProteinName=pm.ProteinName;StartIndex=pm.StartIndex;EndIndex=pm.EndIndex;Weight=System.Math.Round(pm.Weight,2)})
    |> Seq.groupBy(fun pm -> pm.Weight)
    |> Seq.map(fun (w,pm) -> {Weight= w; ProteinMatchs = pm |> Seq.toList })

More love: the groupBy function for the summation is perfect. The groupBy function in python does not return a similar data structure of the index and the associated collections – the way F# does it makes building up that data structure a snap. Less Code, fewer errors, more fun.

Once the functions were in place, I took them out for a spin

let filePath = @"/Users/jamesdixon/Documents/Hypedsearch_All/hypedsearch/data/database/sample_database.fasta"
let fileContents = File.ReadLines(filePath) |> Seq.cast |> Seq.toArray
let parsedFileContents = parseFastaFileContents fileContents
let proteins = generateProteins parsedFileContents
let proteinMatches = generateAllProteinMatches proteins 2
let weightProteinMatches = generateWeightProteinMatches (proteinMatches |> Seq.toList)

And it ran like a champ

Since I am obviously a F# fan-boy, I much preferred writing the F#. I am curious what my python-centric colleges will think when I present this…

In Russia, The Gene Domain Models You

When I first started getting interested in Computational Biology, I had a very simplistic mental model of genes based on the “central dogma of biology”: DNA makes RNA and RNA makes proteins.  I thought that the human genome was just computer code – instead of binary ones and zeros, it was base-four “A” “T” “C” “G”.*.  Therefore, to understand it, just start mapping the genome like the human genome project did and then see the areas that I am interested in: the four billion nucleotides are memory on the hard drive with some of the genome being the operating system and some being installed software.  When the computer is powered on, the ones and zeros are read off of the hard drive and placed into memory – the equivalent would be the DNA being read out of the chromosomes and placed into RNA.

Man, was I wrong.

DNA is not just your operating system and installed programs – it is the complete instructions to make the computer, turn it on, write, compile, and then run the most sophisticated software in the world.  Oh, it also has the instructions to replicate itself and correct errors that might be introduced during replication.  And we can barely figure out how to write Objective C for a phone app…

So carrying the analogy of the human genome to computer, even if we could determine which part of bytes on the hard drive is for building a transistor, for example, we have another problem.  Unlike a computer’s hard drive where each byte is allocated to only one purpose, each nucleotide can be used by none, one, or many genes.  It is a fricken madhouse – a single “C-G” pair might be used in creating a val amino acid in one protein for one gene, frameshifted to creating an ala amino acid in a different protein for another gene, and then be used in the regulation region of yet another gene being read in the reverse direction.

The implication is that it does not appear possible to “build up” and domain model of the genome.  You can’t take a series of nucleotides of DNA like “AAAGGTTCGTAGATGCTAG” and know anything about what it is doing.  Rather, it looks like the domain model has to work in reverse:  Given a gene like TP53, allocate different sections of DNA to the different regions: Promoter, Intons, Exons, UTRs, etc….

From a F# modeling point of view, DNA is certainly an “OR” type:

type DNA = A | T | C| G

With the caveat that we sometimes don’t know if a location is really an A, rather it is not a G or T. Sweeping aside that problem, then individual nucleotides are an “AND” type:

Type Nucleotide = {Index: int; DNA: DNA; etc…}

let nucleotide0 = {Index=0; DNA=C; etc…}

and then gene would look something like this:

let tP53 = {Gene= TP53; Promoter = [nucleotide0; nucleotide1]; etc…}

Note that I am only 1/3 of the way through my genetics class right now, so I might change my understanding next week.  For now, this is my Mental Model 0.2 of the genome.

*side note: some April 4th, I want to sneak into all of the computational biologists offices and steal the A,C,T,G,Us keys from their keyboards.  Pandemonium would reign.

Looking at SARS-CoV-2 Genome with F#

(This post is part of the FSharp Advent Calendar Series. Thanks Sergy Thion for organizing it)

I have just finished up a Cellular and Molecular Biology class at University of Colorado – Boulder (“CU Boulder”, not “UC Boulder” for the unaware) and I was smitten by a couple of the lectures about the COVID virus.  Briefly, viruses exist to propagate and since they are an obligate intercellular parasite, they need to find a host cell to encode the host cell’s proteins for that end.  That means they enter, hijack some cell proteins, replicate, and then leave to find more cells.

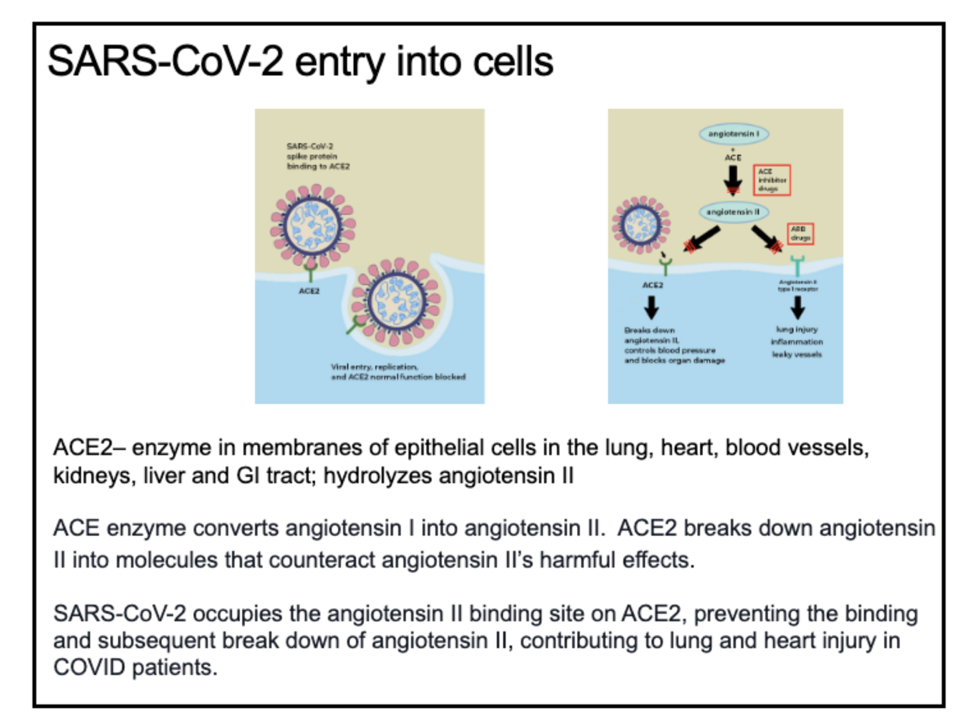
The COVID genome doesn’t really set out to kill humans, that is a side effect of the virus entering the cells (mostly in the lungs) via a common binding site called ACE2.  Since the virus takes up the binding site, some regular bodily functions are inhibited so lots of people get sick and some people die.  Just like farmers in Brazil view destroying the Amazon rain forest as an unfortunate side effect of them creating a farm to support their families (and then have offspring), the virus doesn’t mean to kill all of these people – it’s just business.

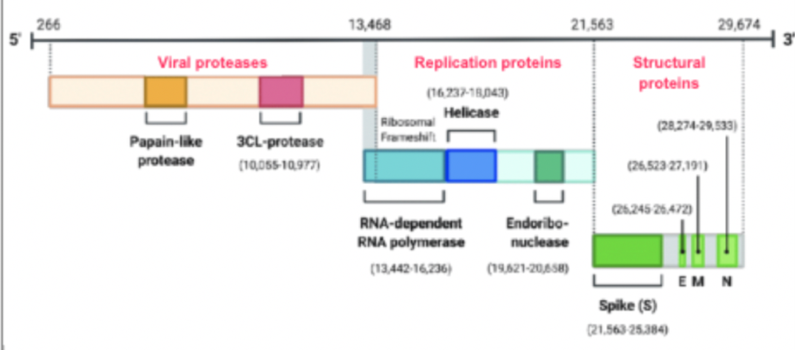
From a computational challenge, the COVID genome is 29,674 base pairs long – which is shockingly small. 

You can download the genome from NCBI here.  This is a reference genome, which means it is represents several samples of the virus for analysis – it is not one particular sample.  The download is in FASTA format – which is a pretty common way to represent the nucleotides of a genome.

Firing up Visual Studio Code, I imported the COVID genome and parsed the file to only have the nucleotides

open System

open System.IO

let path = “/Users/jamesdixon/Downloads/sequence.fasta”

let file = File.ReadAllText(path)

let totalLength = file.Length

let prefixLength = 97

let suffixLength = 2

let stringSequence = file.Substring(prefixLength,totalLength-prefixLength-suffixLength)

I then applied some F# magic to get rid of the magic strings and replace them with a typed representation.

type Base = A | C | G | T

let baseFromString (s:String) =

    match s.ToLowerInvariant() with

    | “a” -> Some A

    | “c” -> Some C

    | “t” -> Some T

    | “g” -> Some G

    | _ -> None

let arraySequence = stringSequence.ToCharArray()

let bases =

    arraySequence

    |> Seq.map(fun c -> c.ToString())

    |> Seq.map(fun s -> baseFromString s)

    |> Seq.filter(fun b -> b.IsSome)

    |> Seq.map(fun b -> b.Value)

I then went back to the original page and started looking at highlights of this genome.  For example, the first marker is this:

UTR stands for “Untranslated Region” – basically ignore the first 265 characters.

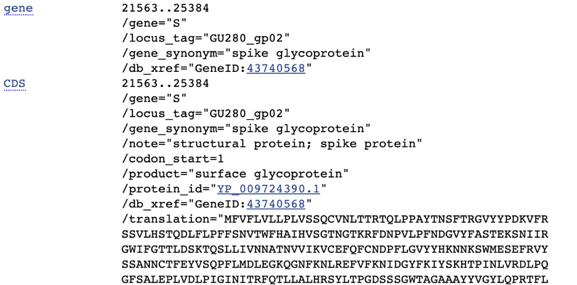
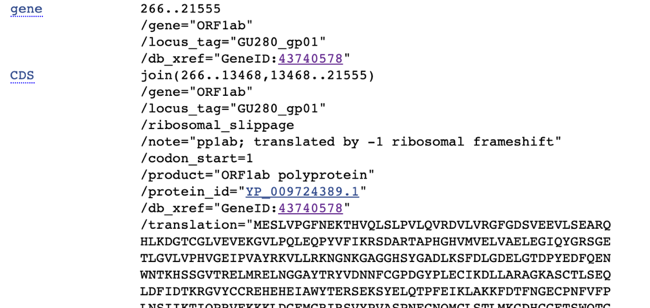
The most famous gene in this virus is the spike protein

Where “CDS” stands for coding sequences.  Using F#, you can find it as

let spikeLength = abs(21563-25384)

let spike = bases |> Seq.skip 21561 |> Seq.take (spikeLength)

spike

Note that I subtracted two from the CDS value – one because sequences are zero based and one because I am using the “skip” function to go to the first element of the subsequence.

Going back to the first gene listed, you can see in the notes “translated by -1 ribosomal frameshift”

One of the cool things about viruses is that because their genome is so small, they can generate multiple genes out of the same base sequence.  They do this with a technique called “frameshifting” where the bases are read in groups of three (a codon) from different start locations – effectively using the same base pair in either the first, second, or their position of a codon.  I believe that the ORF1ab gene is read with a frameshift of -1, so the F# would be:

 let orf1abLength = abs(266-21555)

let orf1ab = bases |> Seq.skip 263 |> Seq.take (spikeLength)

orf1ab

I subtracted three from the CDS value – one because of zero-based, one for the skip function, and one for the frameshift.  I am not 100% that this is the correct interpretation, but it is a good place to start.

I then wanted to look at how the codons mapped to amino acids.  I am sure this mapping is done thousands of times in different programs/languages – The F# type system makes the mapping a bit less error prone.  Consider the following snippet:

type AminoAcid = Phe | Leu | Iie | Met | Val | Ser | Pro | Thr | Ala | Tyr | His | Gin | Asn | Lys | Asp | Glu

type Codon = Stop | AminoAcid of AminoAcid

I am sure other implementations put the Stop codon with the Amino Acid even though it is not an amino acid.  Keeping them separate is more correct – and can prevent bugs later on.

I then started creating a function to map three bases into the correct codon.  I initially did something like this:

let AminoAcidFromBases bases =

    match bases with

    | TTT -> Phe | TTC -> Phe

    | TTA -> Leu | TTG -> Leu | CTT -> Leu | CTC -> Leu | CTA -> Leu | CTG -> Leu

    | ATT -> Iie | ATC -> Iie | ATA -> Iie

Even though the compiler barfs on this syntax, it is the most intuitive and matches the domain best.  I then started coding for the code, rather the domain, by using a sequence like this

let AminoAcidFromBases bases =

    match bases with

    | [TTT] -> Phe | [TTC] -> Phe

    | [TTA] -> Leu | [TTG] -> Leu | [CTT] -> Leu | [CTC] -> Leu | [CTA] -> Leu | [CTG] -> Leu

I also had the problem of incomplete cases – I need the “else” condition like this:

    | [] -> None

Which means I then have to go back and put Some in front of all of the results:

    | [TTT] -> Some Phe | [TTC] -> Some Phe

But then my code is super cluttered

Also, if I want the function to be “CondonFromBases” versus “AminoAcidFromBasis”, I would have to add this

    | [TTT] -> Some (AminoAcid Phe) | [TTC] -> Some (AminoAcid Phe)

And ugh, super-duper clutter.

I am still thinking through the best way to represent this part of the domain.  Any suggestions are welcome.

Hopefully this post will inspire some F# people to start looking at computational biology – there are tons of great data out there and lots of good projects with which to get involved.

Gist is here

Functional Bioinformatics Algorithms: Part 2

Pressing on with more bioinformatic algorithms implemented in a functional style, the next algorithm found in Bioinformatics Algorithms by Compeau and Pevzner is to find the most frequent pattern in a string of text.

I started writing in the imperative style from the book like so (the length of the substring to be found is called the “k-mer” so it gets the parameter name “k”)

type Count = {Text:string; PatternCount:int}
let frequentWords (text:string) (k:int) =
    let patternCount (text:string) (pattern:string) =
        text 
        |> Seq.windowed pattern.Length 
        |> Seq.map(fun c -> new string(c))
        |> Seq.filter(fun s -> s = pattern)
        |> Seq.length

    let counts = new List<Count>()
    for i = 0 to text.Length-k do
        let pattern = text.Substring(i,k)
        let patternCount = patternCount text pattern
        let count = {Text=text; PatternCount=patternCount}
        counts.add(count)
        counts |> Seq.orderByDesc(fun c -> c.PatternCount)
        let maxCount = counts|> Seq.head
    let frequentPatterns = new List<Count>()
    for i = 0 to counts.length
        if count.[i].PatternCount = maxCount then
            frequentPatterns.add(count.[i])
        else
            ()

But I gave up because, well, the code is ridiculous. I went back to the original pattern count algorithms written in F# and then added in a block to find the most frequent patterns:

let frequentWords (text:string) (k:int) =
    let patternCounts =
        text
        |> Seq.windowed k
        |> Seq.map(fun c -> new string(c))
        |> Seq.countBy(fun s -> s)
        |> Seq.sortByDescending(fun (s,c) -> c)
    let maxCount = patternCounts |> Seq.head |> snd
    patternCounts 
        |> Seq.filter(fun (s,c) -> c = maxCount)
        |> Seq.map(fun (s,c) -> s)

The VS Code linter was not happy with my Seq.countBy implementation… but it works. I think the code is explanatory:

  1. window the string for the length of k

2. do a countyBy on the resulting substrings

3. sort it by descending, find the top substring amount

4. filter the substring list by that top substring count.

The last map returns just the pattern and leaves off the frequency, which I think is a mistake but is how the book implements it. Here is an example of the frequentWords function in action:

let getRandomNuclotide () =
    let dictionary = ["A";"C";"G";"T"]
    let random = new Random()
    dictionary.[random.Next(4)]

let getRandomSequence (length:int) =
    let nuclotides = [ for i in 0 .. length -> getRandomNuclotide() ]
    String.Join("", nuclotides)

let largerText = getRandomSequence 1000000

let currentFrequentWords = frequentWords largerText 9
currentFrequentWords

I didn’t set the seed value for generating the largerText string so the results will be different each time.

Gist is here

Functional Bioinformatics Algorithms

I have been looking at bioinformatics much more seriously recently by taking Algorithms for DNA Sequencing by Ben Langmead on Cousera and working though Bioinformatics Algorithms by Compeau and Pevzner. 

I noticed in both cases that the code samples are very much imperative focused: lots of loops, lots of mutable variables, lots of mess. I endeavored to re-write the code in a more functional style using immutable variables and pipelining functions

Consider the code for Pattern Count, a function that counts how often a pattern appears in a larger string. For example, the pattern “AAA” appears in the larger string “AAATTTAAA” twice. If the larger string was “AAAA”, the pattern “AAA” is also twice since AAA appears in index 0-2 and index 1-3.

Here is the code that appears in the book:

let patternCount (text:string) (pattern:string) =
    let mutable count = 0
    for i = 0 to (text.Length - pattern.Length) do
        let subString = text.Substring(i,pattern.Length)
        if subString = pattern then
            count <- count + 1
        else
            ()
    count

Contrast that to a more functional style:

let patternCount (text:string) (pattern:string) =
    text 
    |> Seq.windowed pattern.Length 
    |> Seq.map(fun c -> new string(c))
    |> Seq.filter(fun s -> s = pattern)
    |> Seq.length

There are three main benefits of the functional style:

  1. The code is much more readable. Each step of the transformation is explicit as a single line of the pipeline. There is almost a one to one match between the text from the book and the code written. The only exception is the Seq.map because the windowed function outputs as a char array and we need to transform it back into a string.
  2. The code is auditable. The pipeline can be stopped at each step and output reviewed for correctness.
  3. The code is reproducible. Because each of the steps uses immutable values, pattern count will produce the same result for a given input regardless of processor, OS, or other external factors.

In practice, the pattern count can be used like this:

let text = "ACAACTCTGCATACTATCGGGAACTATCCT"
let pattern = "ACTAT"
let counts = patternCount text pattern

val counts : int = 2

In terms of performance, I added in a function to make a sequence of ten million nucleotides and then searched it:

let getRandomNuclotide () =
    let dictionary = ["A";"C";"G";"T"]
    let random = new Random()
    dictionary.[random.Next(4)]

let getRandomSequence (length:int) =
    let nuclotides = [ for i in 0 .. length -> getRandomNuclotide() ]
    String.Join("", nuclotides)

let largerText = getRandomSequence 10000000
#time
let counts = patternCount largerText pattern

Real: 00:00:00.814, CPU: 00:00:00.866, GC gen0: 173, gen1: 1, gen2: 0
val counts : int = 9816

It ran in about one second on my macbook using only 1 processor. If I wanted to make it faster and run this for the four billion nucleotides found in human DNA, I would use the Parallel Seq library, which is a single letter change to the code. That would be a post for another time…

The gist is here

Web Crawling Using F#

(This post is part of the FSharp Advent Calendar Series. Thanks Sergy Thion for organizing it)

Recently, I had the need to get articles from some United States government websites. You would think in 2019 that these sites might have apis and you would think wrong. In each case, I needed to crawl the site’s HTML and then extract the information. I started doing this with Python and its beautiful soup library but I can into the fundamental problem that getting the html was much harder than parsing the site. To illustrate, consider this website

I need to go through all 8 pages of the grid and download the .pdfs that are associated with the “View Report” link. The challenge in this particular site is that they didn’t do any url parameters so there is no way to go through the grid via the uri. Looking at the page source, they are using ASP.NET and in typical enterprise-derpy manner, named their table “GridView1”

The way to get to the next page is to press on the “Next” link defined like this:

They over-achieved in the bloated View State for a simple page category though.

post04

#Sigh

So as bad as this site is, F# made getting the data a snap. I fired up Visual Studio and created a new .NET Core F# project. I added a script file. I realized that the button-press to get to the next page was going to be a pain to program, so I decided to use the .NET framework WebBrowser class. It’s nice because it has all of the apis I needed for the traversal and I didn’t have to make the control visible.

My first function was to get the uris from the grid – easy enough using the HtmlDocument and HtmlElement classes:

let getPdfUris (document:HtmlDocument) =

    let collection = document.GetElementsByTagName(“a”)

    collection

    |> Seq.cast

    |> Seq.filter(fun e -> e.OuterText = “View Report”)

    |> Seq.map(fun e -> e.GetAttribute(“href”))

Note the key word I used to filter was “View Report”, so at least the web designer stayed consistent there.

Next, I used basically the same logic to find the Next button in the DOM. Note that I am using the TryFind function so if the button is not found, a None is returned:

let getNextButton (document:HtmlDocument) =


    let collection = document.GetElementsByTagName(“a”)

    collection

    |> Seq.cast

    |> Seq.tryFind(fun e -> e.InnerText = “Next”)

So the next function was my giggle moment for this project. To “press” that button to invoke the javascript to go to the next page of the grid, I ised the InvokeMember method of the HtmlClass

let invokeNextButton (nextButton: HtmlElement) =

    nextButton.InvokeMember(“Click”) |> ignore

    printfn “Next Button Invoked”

Yup, that works! I was worried that I was going to have to screw around with the javascript or, worse, that beast called View State. Fortunately, that InvokeMember method worked fine. Another reason why I love the .NET framework.

So with these three functions set up, I created a method to be called each time the document is refreshed

let handlePage (browser:WebBrowser) (totalUris:List) =


    let document = browser.Document


    let uris = getPdfUris document

   totalUris.AddRange(uris)


    let nextButton = getNextButton document


    match nextButton with

    | Some b ->

        invokeNextButton b

    | None -> ()

My C#-only friends spend waaaay to much time worrying about the last page and having no button and how to code it. I used the option type – is there a Next button? Press it and do work. No Button? Do nothing.

I put in a function to save the .pdf to my local file system

let downloadPdf (uri:string) =


    let client = new WebClient();


    let targetFilePath = @”C:\Temp\” + Guid.NewGuid().ToString() + “.pdf”;

    client.DownloadFile(uri,targetFilePath)

And now I can write this all together:

let browser = new WebBrowser()

let uris = new List()

browser.DocumentCompleted.Add(fun _ -> handlePage browser uris)

let uri = https://www.catalog.state.ct.us/cid/portalApps/examinations.aspx&#8221;

browser.Navigate(uri)

printf “Links Done”

uris |> Seq.iter(fun uri -> downloadPdf uri)

printf “Downloads Done”

So I new up the browser, send handlePage to the DocumentCompleted event handler. Every time the Next button is pressed, the document loads and the DocumentCompleted event fires, and the .pdfs are downloaded and the next button is pressed. Until the last page, when there is no button to press.

And it worked like a champ:

post06

Gist is found here 

Panzer General Domain-Driven Design

(Part 8 of the Panzer General Portable Project)

Next on the agenda for Panzer General was the domain modeling task. This is not a trivial undertaking because of the sheer numbers of units, equipment, and terrain that the game supports. Fortunately, resources by Scott Waschlin and Isaac Abraham give a good background and I have done some F# DDD in the past.

I started with a straightforward entity – the nation. PG supports 14 different nations representing two tribes – the allies and the axis. Ignoring the fact that Italy switched sides in 1943, my model looked like this:

type AxisNation =
Bulgaria
German
Hungary
Italy
Romania

type AlliedNation =
France
Greece
UnitedStates
Norway
Poland
SovietUnion
GreatBritian
Yougaslovia
OtherAllied

type Nation =
Allied of AlliedNation
Axis of AxisNation
Neutral


So now in the game, whenever I assign units or cities to a side, I have to assign it to a nation. I can’t just say “this unit is an allied unit” and then deal with the consequences (like a null ref) later. F# forces me to assign a nation all of the time – and then guarantees that the nation is assigned later on in the program. This one simple concept eliminates so many potential bugs – and which is why F# is such a powerful language. Also, since I am guaranteed correctness, I don’t need unit tests, which makes my code base much more maintainable.


I also needed a mapping function to interchange NationId (used by the data files of the game) and the Nation type. That was also straightforward:


let getNation nationId =
    match nationId with
    | 2 -> Allied OtherAllied
    | 3 -> Axis Bulgaria
    | 7 -> Allied France
    | 8 -> Axis German
    | 9 -> Allied Greece
    | 10 -> Allied UnitedStates
    | 11 -> Axis Hungary
    | 13 -> Axis Italy
    | 15 -> Allied Norway
    | 16 -> Allied Poland
    | 18 -> Axis Romania
    | 20 -> Allied SovietUnion
    | 23 -> Allied GreatBritian
    | 24 -> Allied Yougaslovia
    | _ -> Neutral


Moving on from nation, I went to Equipment. This is a bit more complex. There are different types of equipment: Movable equipment, Flyable Equipment, etc…. Instead of doing the typical OO “is-a” exercise, I started with the attributes for all equipment:


type BaseEquipment =  {
    Id: int; Nation: Nation;
    IconId: int
    Description: string; Cost: int;
    YearAvailable:int; MonthAvailable: int;
    YearRetired: int; MonthRetired: int;
    MaximumSpottingRange: int;
    GroundDefensePoints: int
    AirDefensePoints: int
    NavalDefensePoints: int
    }


Since all units in PG can be attacked, they all need defense points. Also notice that there is a Nation attribute on the equipment – once again F# prevents null refs by lazy programmers (which is me quite often) – you can’t have equipment without a nation.


Once the base equipment is set, I needed to assign attributes to different types of equipment. For example, tanks have motors so therefore have fuel capacity. It makes no sense to have a fuel attribute to a horse-drawn unit, for example. Therefore, I needed a movable and then motorized movable equipment types


type MoveableEquipment = {
    MaximumMovementPoints: int;
    }
    
type MotorizedEquipment = {
    MoveableEquipment: MoveableEquipment
    MaximumFuel: int}


Also, there are different types of motorized equipment for land (that might be tracked, wheeled, half-tracked) as well as sea and air equipment:


type FullTrackEquipment = | FullTrackEquipment of MotorizedEquipment
type HalfTrackEquipment = | HalfTrackEquipment of MotorizedEquipment
type WheeledEquipment = | WheeledEquipment of MotorizedEquipment

type TrackedEquipment =
FullTrack of FullTrackEquipment
HalfTrack of HalfTrackEquipment

type LandMotorizedEquipment =
Tracked of TrackedEquipment
Wheeled of WheeledEquipment

type SeaMoveableEquipment = {MotorizedEquipment: MotorizedEquipment}
type AirMoveableEquipment = {MoveableEquipment: MoveableEquipment}


With the movement out of the way, some equipment can engage in combat (like a tank) and others cannot (like a transport)


type LandTargetCombatEquipment = {
    CombatEquipment: CombatEquipment;
    HardAttackPoints: int;
    SoftAttackPoints: int;
    }

type AirTargetCombatEquipment = {
    CombatEquipment: CombatEquipment;
    AirAttackPoints: int;
    }

type NavalTargetCombatEquipment = {
    CombatEquipment: CombatEquipment;
    NavalAttackPoints: int
    }


With movement and combat accounted for, I could start building the types of equipment


type InfantryEquipment = {
    BaseEquipment: BaseEquipment
    EntrenchableEquipment: EntrenchableEquipment;
    MoveableEquipment: MoveableEquipment;
    LandTargetCombatEquipment: LandTargetCombatEquipment
    }


type TankEquipment = {
    BaseEquipment: BaseEquipment
    FullTrackedEquipment: FullTrackEquipment;
    LandTargetCombatEquipment: LandTargetCombatEquipment
    }


There are twenty two different equipment types – you can see them all in the github repsository here.


With the equipment out of the way, I was ready to start creating units – unit have a few stats like name and strength, as well as how much ammo and experience they have if they are a combat unit


type UnitStats = {
    Id: int
    Name: string
    Strength: int;
    }
    
type ReinforcementType =
Core
Auxiliary

type CombatStats = {
    Ammo: int;
    Experience:int;
    ReinforcementType:ReinforcementType    }

type MotorizedMovementStats = {
    Fuel: int;}


With these basic attributes accounted for, I could then make units of the different equipment types. For example:


type InfantryUnit = {UnitStats: UnitStats; CombatStats: CombatStats; Equipment: InfantryEquipment
    CanBridge: bool; CanParaDrop: bool}
type TankUnit = {UnitStats: UnitStats; CombatStats: CombatStats; MotorizedMovementStats:MotorizedMovementStats
    Equipment: TankEquipment}


PG also has different kinds of infantry units like this:

type Infantry =
Basic of InfantryUnit
HeavyWeapon of InfantryUnit
Engineer of InfantryUnit
Airborne of InfantryUnit
Ranger of InfantryUnit
Bridging of InfantryUnit


and then all of the land units can be defined as:


type LandCombat =
Infantry of Infantry
Tank of TankUnit
Recon of ReconUnit
TankDestroyer of TankDestroyerUnit
AntiAir of AntiAirUnit
Emplacement of Emplacement
AirDefense of AirDefense
AntiTank of AntiTank
Artillery of Artillery


There are a bunch more for sea and air, you can see on the github repository. Once they are all defined, they can be brought together like so:


type Transport =
Land of LandTransportUnit
Air of AirTransportUnit
Naval of NavalTransport

type Unit =
Combat of Combat
Transport of Transport


It is interesting to compare this domain model to the C# implementation I created six years ago. They key difference that stick out to me is to take properties of classes and turn them into types. So instead of a Fuel property of a unit that may or may not be null, there are MotorizedUnit types that require a fuel level. Instead of a bool field of like CanAttack or an interface like IAttackable, the behavor is baked into the type


Also, the number of files and code dropped significantly, which definitely improved the code base:


It is not all fun and games though, because I still need a mapping function to take the data files from the game and map them, to the types


as well as functions to pull actionable data out of the type like this:


let getMoveableEquipment unit =
    match unit with 
    | Unit.Combat c -> 
        match c with 
        | Combat.Air ac -> 
            match ac with
            | AirCombat.Fighter acf ->
                match  acf with
                | Fighter.Prop acfp -> Some acfp.Equipment.MotorizedEquipment.MoveableEquipment
                | Fighter.Jet acfj -> Some acfj.Equipment.MotorizedEquipment.MoveableEquipment
            | AirCombat.Bomber acb ->
                match acb with
                | Bomber.Tactical acbt -> Some acbt.Equipment.MotorizedEquipment.MoveableEquipment
                | Bomber.Strategic acbs -> Some acbs.Equipment.MotorizedEquipment.MoveableEquipment
        | Combat.Land lc ->
            match lc with 


So far, that trade-off seems worth it because I just have to write these supporting functions once and I get guaranteed correctness across the entire code base – without hopes, prayers, and unit tests….


Once I had the units set up, I followed a similar exercise for Terrain. The real fun for me came to the next module – the series of functions to calculate movement of a unit across terrain. Each tile has a movement cost that is calculated based on the kind of equipment and the condition of a tile (tanks move slower over muddy ground)


let getMovmentCost (movementTypeId:int) (tarrainConditionId:int)
    (terrainTypeId:int) (mcs: MovementCostContext.MovementCost array) =
    mcs |> Array.tryFind(fun mc -> mc.MovementTypeId = movementTypeId &&
                                    mc.TerrainConditionId = tarrainConditionId &&
                                    mc.TerrainTypeId = terrainTypeId)


I need the ability to calculate all possible moveable tiles for a given unit. There are some supporting functions that you can review in the repository and the final calculator I am very happy with


let getMovableTiles (board: Tile array) (landCondition: LandCondition) (tile:Tile) (unit:Unit)  =
    let baseTile = getBaseTile tile
    let maximumDistance = (getUnitMovementPoints unit) – 1
    let accumulator = Array.zeroCreate<Tile option0
    let adjacentTiles = getExtendedAdjacentTiles accumulator board tile 0 maximumDistance
    adjacentTiles
    |> Array.filter(fun t -> t.IsSome)
    |> Array.map(fun t -> t.Value)
    |> Array.map(fun t -> t, getBaseTile t)
    |> Array.filter(fun (t,bt) -> bt.EarthUnit.IsNone)
    |> Array.filter(fun (t,bt) -> canLandUnitsEnter(bt.Terrain))
    |> Array.map(fun (t,bt) -> t)


and the results show:


With the domain set up, I can then concentrate on the game play


Animations in Xamarin Forms (XF)

(Part 7 of the Panzer General Portable Project)

Granted, there are not a lot of animations in Panzer General – which is one of the reasons I thought it would be a good candidate for Fabulous and XF.  However, there is 1 place where there is a 6 frame animation – when there is a battle and a unit takes damage.  The images look like this:

explode

and animated like this

When I did Panzer General in Windows Phone 6/7 using WPF, it was very simple to use a a storyboard and an ObjectAnimation class like this

1 <Storyboard x:Name="ExplodeStoryboard"> 2 <ObjectAnimationUsingKeyFrames 3 Storyboard.TargetName="ExplodeTranslateTransform" 4 Storyboard.TargetProperty="X" Duration="0:0:1" Completed="ObjectAnimationUsingKeyFrames_Completed"> 5 <DiscreteObjectKeyFrame KeyTime="0:0:0" Value="0" /> 6 <DiscreteObjectKeyFrame KeyTime="0:0:.2" Value="-60" /> 7 <DiscreteObjectKeyFrame KeyTime="0:0:.4" Value="-120" /> 8 <DiscreteObjectKeyFrame KeyTime="0:0:.6" Value="-180" /> 9 <DiscreteObjectKeyFrame KeyTime="0:0:.8" Value="-240" /> 10 <DiscreteObjectKeyFrame KeyTime="0:0:1" Value="100" /> 11 </ObjectAnimationUsingKeyFrames> 12 </Storyboard>

In XF, it looks like there is only 1 timer available so I need to hook into it like this

1 module ChickenSoftware.PanzerGeneral.ExplodeDemo 2 3 open Xamarin.Forms 4 5 let addContent (layout:AbsoluteLayout) = 6 let image = new Image() 7 image.Source <- ImageSource.FromResource("explode0") 8 let x = 50.0 9 let y = 50.0 10 let height = 50.0 11 let width = 60.0 12 let rectangle = new Rectangle(x,y,width,height) 13 layout.Children.Add(image , rectangle) 14 15 let mutable index = 1 16 let callback = new System.Func<bool>(fun _ -> 17 match index with 18 | 1 -> image.Source <- ImageSource.FromResource("explode1"); index <- 2 19 | 2 -> image.Source <- ImageSource.FromResource("explode2"); index <- 3 20 | 3 -> image.Source <- ImageSource.FromResource("explode3"); index <- 4 21 | 4 -> image.Source <- ImageSource.FromResource("explode4"); index <- 5 22 | 5 -> image.Source <- ImageSource.FromResource("explode0"); index <- 99 23 | _ -> () 24 true) 25 Device.StartTimer(System.TimeSpan.FromSeconds(20.25),callback) 26 27 let populateImage = 28 let layout = new AbsoluteLayout() 29 layout.HeightRequest <- 5000.0 30 layout.WidthRequest <- 5000.0 31

The key lines is 16, where I create the callback function that gets called each time the timer triggers and then line 25 when the Device class has a method called “StartTimer”

This works

image

since there is no other animation in the game, I *think* this will work.  I guess I will see soon enough

Handling User Interaction Using Xamarin Forms (XF)

(Part 6 of the Panzer General Portable Project)

Now that I have a rudimentary board in place, I need to understand basic user interaction with the board. The most common gesture is the tap. When I creted the Windows Phone 6/7 version of this game using native WPF, it was very easy to work with these concepts. The Xamarin Forms (XF), not so much.

In XF, capturing a user’s tap on the screen is done via the TapGestureRecognizer class. For example, to see if a person taps on an given game hex you can write some code like this (lines 1 and 19 are the important ones below):

1 let tapRecognizer = new TapGestureRecognizer() 2 3 let getTerrainFrame (tile: Tile) (scale:float) = 4 let baseTile = getBaseTile tile 5 let baseTerrain = getBaseTerrainFromTerrain baseTile.Terrain 6 let tileId = baseTerrain.Id 7 let locatorPrefix = 8 match baseTerrain.Condition with 9 | LandCondition.Dry -> "tacmapdry" 10 | LandCondition.Frozen -> "tacmapfrozen" 11 | LandCondition.Muddy -> "tacmapmuddy" 12 let frame = new TileFrame(tile) 13 let terrainImageLocator = locatorPrefix + tileId.ToString() 14 let image = getImage terrainImageLocator 15 image.Scale <- (scale + 0.6) 16 frame.BackgroundColor <- Color.Transparent 17 frame.BorderColor <- Color.Transparent 18 frame.Content <- image 19 frame.GestureRecognizers.Add(tapRecognizer) 20 frame 21

The getTerrainFrame is called for each hex that is created for the game board

Since there can be multiple frames layered on top of the base terrain image (like units, nation flags, etc..) we need a way for those frames to not capture the tap event. Enter the InputTransparent property (line 8 below)

1 let getSingleUnitFrame (iconId:int) (scale:float) = 2 let frame = new Frame() 3 let path = "tacicons" + iconId.ToString() 4 let image = getImage path 5 image.Scale <- (scale + 0.6) 6 frame.BackgroundColor <- Color.Transparent 7 frame.BorderColor <- Color.Transparent 8 frame.InputTransparent <- true 9 frame.Content <- image 10 Some frame 11

With each hex’s base frame now wired up to this tap recognizer, I need a way to send data into the event and a way to get the data out of the event.

My first thought was to use the eventArgs – which is the way I have done it 100% of the time before this project. I was thinking code like this:

1 type TapEventArgs(tileId:int) = 2 inherit EventArgs() 3 member this.TileId = tileId 4

Where I have an custom event type that inherits from EventArgs and can can put whatever data I want into the additional properities – in this case the unique Id for the Hex/Tile

I could then create an event handler that handles the event and gets the needed data from the event args:

1 let handleTapEvent (sender:Object) (e:TapEventArgs) = 2 app.MainPage.DisplayAlert(e.TileId.ToString(), "OK") |> ignore 3 () 4

And then to wire things together, I would use an EventHandler class

1 let tapEventHandler = new EventHandler<TapEventArgs>(handleTapEvent) 2 tapRecognizer.Tapped.AddHandler(tapEventHandler :> EventHandler<EventArgs>) 3

Unfortunately, this does not work!  When doing a simple cast, I get

The type ‘EventArgs’ is not compatible with the type ‘TapEventArgs’

and if I try and force it into the event handler

1 let tapEventHandler = new EventHandler<TapEventArgs>(handleTapEvent)

I get this error

This expression was expected to have type ‘EventHandler’ but here has type ‘EventHandler<TapEventArgs>’

You can see my trail of tears on stack overflow here

So instead of spending my time fighting with the compiler, I decided to use the other event arg: object

1 let handleTapEvent (sender:Object) (e:EventArgs) = 2 let tileFrame = sender 😕> TileFrame 3 let tile = tileFrame.Tile 4 let baseTile = getBaseTile tile 5 let tileId = baseTile.Id.ToString() 6 app.MainPage.DisplayAlert("Tile Pressed", tileId, "OK") |> ignore 7 () 8

with the TileFrame inheriting from Frame like so

1 type TileFrame(tile:Tile) = 2 inherit Frame() 3 member this.Tile = tile 4

and I get what I need

image